Web forms are essential for any website to obtain various types of information from visitors, which can be used for future purposes. It works in the same way that we use a paper form to gather or submit information. This lesson guides you on creating web forms and their various useful components, which allow you to collect and manage data easily and efficiently.
What Are Web Forms?
A Web Forms is a part of an HTML document containing HTML form elements such as input, select, checkboxes, radio, buttons, etc. Users typically complete a form by entering texts, selecting options, and modifying form elements before submitting the form for processing.
What Is the Need for Web Form on Any Website?
Some web forms are commonly used, such as contact forms, user subscription forms, registration forms, etc. However, web forms may vary for every business, as their needs are different.
Common types of web forms are as follows:
- Contact form
- Registration form
- Sign-in Form
- Lead generation form
- Order form
- Survey form
- Search form
- Email form
How to Create Forms in HTML?
The <form> tag in HTML is used to define the form in an HTML document. This tag is a container for all other input elements used within this form tag to obtain user input.
Syntax:
<form>
<!-- HTML Form Element -->
</form>
Attributes of the HTML <form> Element
Syntax:
<form action="signin.php" method="post">
<!-- HTML Form Element -->
</form>
The <form> element has two important attributes: the action and the method attributes. Here, the form action specifies the location where the form data will be submitted, and the form method specifies the HTTP method that is usually GET / POST. The various HTTP methods are:
- GET
- POST
- PUT
- PATCH
- DELETE
If you do not specify the action and method attribute in the form element, the default action will be the current page, and the method will be GET.
What Are HTML Form Elements?
Different input types, such as text fields, checkboxes, radio buttons, submit buttons, etc., are used inside the <form> tag to obtain user inputs such as usernames, emails, passwords, etc. According to the input field type, these inputs are manually typed or selected by the user.
Example:
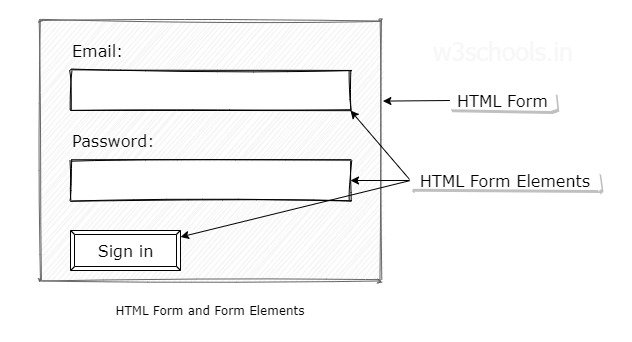
<form name="SignIn" method="post" action="signin.php" >

    <label for="Email">Email:</label><br>
    <p><input type="email" name="email" id="Email"></p>

    <label for="Password">Password:</label>
    <p><input type="password" name="password" id="Password"></p>

    <input type="submit" value="Sign in">

</form>
Output:
HTML Form <input> Element
The HTML form <input> element is the most commonly used form element; It is represented in HTML documents based on its type.
HTML Form Input Types
Different types of input are used with an HTML input tag. Here is the table of input types for reference:
| Input Type | Description | HTML Markup |
|---|---|---|
| text | It defines a single-line text field. | <input type="text">
|
| It defines a single-line text field for an e-mail address. The input value is automatically verified to ensure correctly formatted email addresses. | <input type="email">
| |
| password | It defines a single-line text field for passwords. | <input type="password">
|
| radio | It defines a radio button. Radio buttons are usually presented in a radio group and allow the user to select only one option. | <input type="radio">
|
| checkbox | It defines a checkbox button. Checkbox buttons are usually presented in a group and allow users to select multiple options. | <input type="checkbox">
|
| file | File input provides a browse button to select files to upload. On clicking the button, it opens a file picker dialog from which the user can select files. | <input type="file">
|
| image | Image input provides a browse button to select images for upload. On clicking the button, it opens a file picker dialog from which the user can select only images. | <input type="image">
|
| hidden | Hidden inputs are invisible to users. They allow developers to get some textual data that the user cannot see. | <input type="hidden">
|
| submit | The submit input creates a submit button. On clicking the button, It submits all the form elements to the form handler. | <input type="submit">
|
| reset | The reset input creates a reset button. On clicking the button, It resets all the form elements' values to the default state. | <input type="file">
|
| button | The button input creates a simple button that can be programmed to perform some action. | <input type="button">
|
HTML5 Form Input Types
HTML5 introduced more types of input elements. They are:
| Input Type | Description | HTML Markup |
|---|---|---|
| number | It defines a single-line text field for only numbers. | <input type="number">
|
| tel | It defines a single-line text field for telephone numbers. | <input type="tel">
|
| range | It displays a slider to set the value of an input element. | <input type="range">
|
| url | It defines a single-line text field for a URL address. The input value is automatically verified to ensure a correctly formatted URL. | <input type="url">
|
| search | It defines a single-line text field that is styled differently by web browsers. | <input type="search">
|
| color | It provides an interface to select colors using a visual color picker. | <input type="color">
|
| date | It displays a calendar to select a date that is styled differently by different web browsers. | <input type="date">
|
| time | It specifies single-line text fields for the time input (hours, minutes, and seconds optionally) format. | <input type="time">
|
| datetime-local | It displays a calendar to select both date and time. | <input type="datetime-local">
|
| month | It displays a calendar to select a month. | <input type="month">
|
| week | It displays a calendar to select a week. | <input type="week">
|
HTML Form <lable> Element
The HTML <label> element is the form element; It defines a form element label by holding the element's ID in the "for" attribute.
Example:
<form name="Search" method="post" action="search.php">

    <label for="q">Search:</label><br>
    <p><input type="search" name="q" id="q">

    <input type="submit" value="Go">

</form>
In the example above, the <label> element holds the ID of the search type input element. Here you can focus or activate the form element by clicking on this label text.