Grouping the content into different sections according to the genre is necessary to make the readers and viewers comfortable with the content selection. WordPress is a popular tool that can help sort and group all your website contents into different sections. In this tutorial, you will learn about the concept of WordPress categories and how to use them.
What Are WordPress Categories?
WordPress categories is an essential tool used by admins and users in dividing the website's content into various sections. You must have noticed that the different content you write can be further divided into different categories. The categorization based on genres and types tells readers about the post so that readers can quickly find any post from the post's collection.
Categories are a convenient way to organize your written posts. There may also be multiple subcategories, which makes the hierarchical arrangement of posts potential. Furthermore, a single post can be positioned in more than one category to become available from multiple dimensions. It gives you and readers a lot of flexibility in showing precisely the posts you wish to and accurately the way you want within the site's widgets, menus, or your WordPress theme directly. If no category is added to your posts or contents, then the category is set to uncategorized by default.
How to Create Categories in WordPress?
To create new categories in WordPress, you need to follow the steps mentioned below:
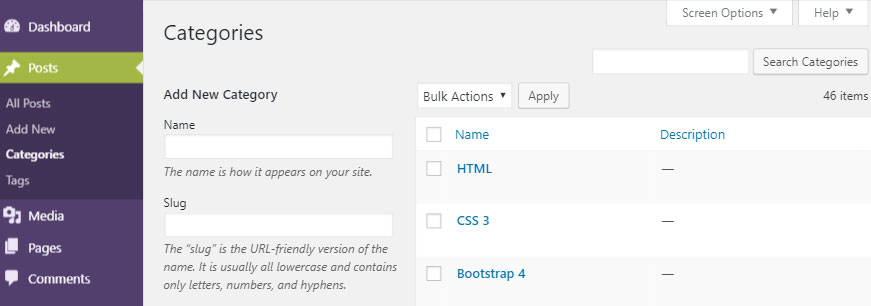
- Go to your WordPress dashboard.
- Navigate to the "Posts" menu > "Categories".
- On the left window pane of your page, you will see a tab that will let you create categories. You have to fill in the category name, followed by the category description in the text box, and when all the information is fed, you have to press the "Add New" Category button.
How to Assign Posts to Categories in WordPress?
You can incorporate the different posts into categories as soon as you set the category structure. There are two ways of doing this. To implement categorization in your posts, you have to open a particular post (or create a fresh one) and then place a checkbox from the Categories section, which you will find in the rightmost bottom corner of your screen for assigning categories to your posts.
Components of Adding Categories
- Name: This is an input field where you will name the category, which will be unique.
- Slug: This is an editable part of the post URL.
- Parent: This is where you can add subcategories or choose none; a selection is optional, specifying your category.
- Description: This option is also optional. Here, you will find a text box to write a brief description of your category.
Editing and Deleting a Category
For editing a category, you have to navigate to the "Posts" menu > "Categories". You can move your mouse over the category to edit and delete.