Adding posts in WordPress to insert content (text, multimedia, and other documents) is a common activity of a WordPress admin user. Posts are also commonly termed blog posts or articles, or blogs. Putting the content on your website is done using this feature of WordPress. In this tutorial, you will learn how to use WordPress Posts.
What Are Posts in WordPress?
"Posts" is a WordPress component that allows users to inscribe a blog and post it on the associated site. These posts are listed in descending order on the front page of the website or blog.
How to Add a New Post in WordPress?
Here are the steps to add new posts to WordPress:
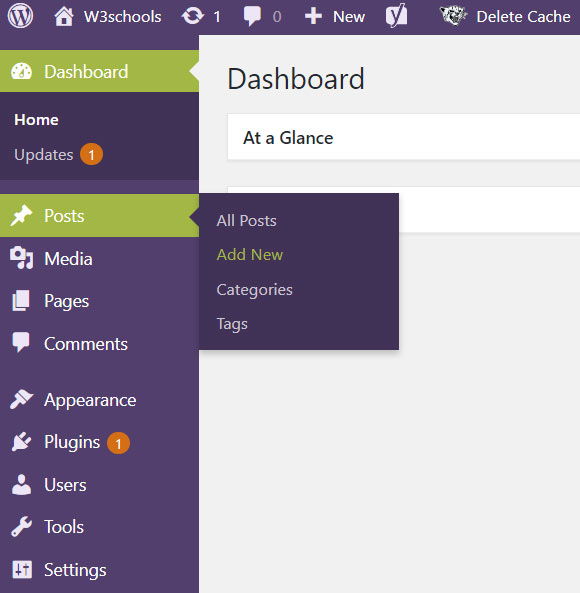
- To add a new Post on your website through WordPress, you must log in to the WordPress account.
- There you will see Admin Sidebar Menu on the left.
- Go to the Posts on the menu and choose Add New.
- Now you will see a new screen where you will be given the option to add a title and content for your web page.
- There are two primary components of this screen:
- Title: where you can insert the title of your post
- Content: where you will inscribe the content for your post. It can be done in two different ways:
- Visual mode lets you write in a regular format using WYSIWYG Editor.
- Text mode allows you to write in HTML format like you are writing in Windows Notepad.
Publishing a New Post in WordPress
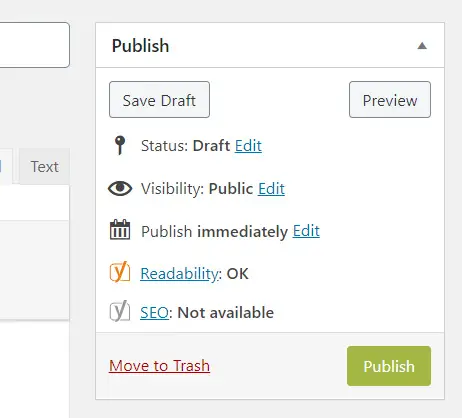
Once you have created the content for your blog or site and set up all the formats and other tags, you now need to publish the content. You have to click the Publish button to publish your desired post. This button will be available on the right side of the panel.
Here is the list of components that comes under the Publish section:
- Save Draft: This button saves the post as a draft.
- Preview: This button is for previewing the post before publishing.
- Move to Trash: This link is for deleting the post.
- Status: This option is to change the current status of the post, whether it is published, pending, or under reviewer draft.
- Visibility: This option is to modify the post's visibility to public, private, or password protected.
- Published: This option is for setting the date and time of publication.
Edit Existing Post
You must go to Posts> All Posts to edit a post. There you will see the list of all created posts. Hover your mouse over any post; You will see the option of Edit and Quick Edit. You can use any one of the options to make changes to your post.
Delete Existing Post
You must go to Posts > All Posts to delete a post. There you will see the list of all existing posts. Hover your mouse over any posts; you will see a Trash link allowing you to delete the post.